In the realm of compact cars, the Honda Civic has long been revered for its reliability, efficiency, and overall performance. When it comes to safety, one of the most critical components of any vehicle is the braking system. In this blog, we’ll delve into everything you need to know about the rotors and brake pads in the Honda Civic, including their function, types, common issues, maintenance tips, and replacement guidelines, to ensure your Civic’s braking system operates at peak performance for safe and confident driving.
Understanding Rotors and Brake Pads in the Honda Civic
Function:
Rotors and brake pads work together as a vital part of the braking system, converting kinetic energy into heat to slow down and stop the vehicle. When the brake pedal is pressed, hydraulic pressure forces the brake pads against the rotors, creating friction and slowing the rotation of the wheels.
Components:
- Brake Rotors: Also known as brake discs, rotors are metal discs mounted to the wheel hub. When the brake pads clamp down on the rotors, friction is created, slowing down the rotation of the wheels and bringing the vehicle to a stop.
- Brake Pads: Brake pads are friction materials attached to metal backing plates. When the brake pedal is pressed, hydraulic pressure pushes the brake pads against the rotors, generating friction and slowing the vehicle.
Common Issues with Rotors and Brake Pads
Wear and Tear:
Over time, both rotors and brake pads can wear down due to normal usage and heat generated during braking. This can lead to decreased braking performance, increased stopping distances, and potential safety hazards if not addressed promptly.
Warping:
Warped or unevenly worn rotors can cause vibration, pulsation, or noise when braking, known as brake pedal pulsation. This can occur due to overheating, aggressive braking, or prolonged use without proper maintenance.
Brake Fade:
Brake fade occurs when the braking performance decreases due to overheating of the brake pads and rotors, resulting in reduced friction and stopping power. This can happen during prolonged or aggressive driving, such as descending steep hills or towing heavy loads.
Maintenance Tips for Rotors and Brake Pads
Regular Inspections:
Inspect the rotors and brake pads regularly for signs of wear, damage, or uneven wear patterns. Look for grooves, scoring, or discoloration on the rotors, and measure the thickness of the brake pads using a brake pad gauge.
Brake Fluid Inspection:
Check the brake fluid level and condition regularly to ensure proper hydraulic pressure and lubrication of the braking system. Top up the brake fluid as needed and flush the brake fluid according to the manufacturer’s recommended intervals.
Brake System Cleaning:
Periodically clean the brake rotors and calipers with brake cleaner to remove dirt, debris, and brake dust buildup. This helps to maintain optimal braking performance and prevents corrosion and premature wear of brake components.
Replacement Guidelines for Rotors and Brake Pads
Signs for Replacement:
Replace the rotors and brake pads on your Honda Civic if you notice any of the following signs:
- Squealing, grinding, or scraping noises when braking
- Vibration or pulsation felt through the brake pedal or steering wheel
- Uneven or excessive wear of the brake pads or rotors
- Reduced braking performance or increased stopping distances
Replacement Procedure:
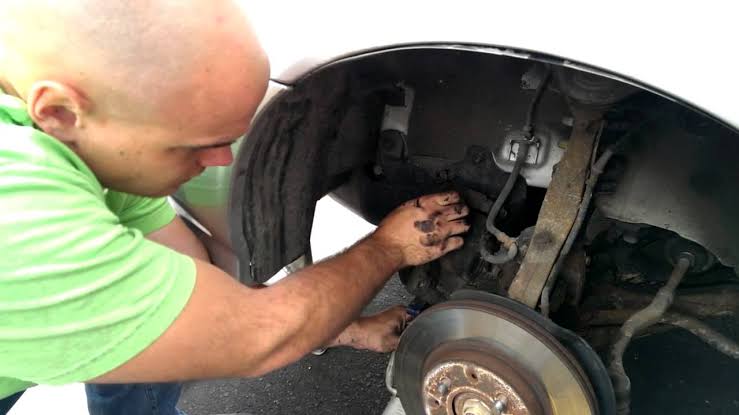
- Prepare the Vehicle: Park your Honda Civic on a level surface and engage the parking brake. Loosen the lug nuts on the wheels using a lug wrench or impact wrench.
- Lift the Vehicle: Use a jack to lift the front or rear of the vehicle, depending on which set of brakes you are replacing. Place jack stands under the vehicle for added safety.
- Remove the Wheels: Once the vehicle is safely lifted and supported, remove the lug nuts and wheels to access the brake components.
- Inspect the Rotors and Brake Pads: Inspect the rotors and brake pads for signs of wear, damage, or uneven wear patterns. Measure the thickness of the brake pads using a brake pad gauge.
- Replace the Rotors: If the rotors are worn, damaged, or warped, remove them from the wheel hub using a rotor removal tool or a hammer and punch. Install the new rotors onto the wheel hub and secure them with lug nuts.
- Replace the Brake Pads: Remove the brake caliper mounting bolts and carefully pry the caliper away from the rotor using a caliper piston tool or a pry bar. Remove the old brake pads and install the new pads into the caliper bracket.
- Reassemble the Brake System: Once the new rotors and brake pads are installed, reassemble the brake system in the reverse order of removal. Ensure all bolts and fasteners are tightened to the manufacturer’s specifications.
- Test the Brakes: Lower the vehicle off the jack stands and test the brakes to ensure proper operation. Gradually apply the brakes while driving at low speeds to bed in the new brake pads and rotors.
Conclusion
Rotors and brake pads are essential components of the braking system in the Honda Civic, ensuring safe and reliable stopping power for everyday driving. By understanding their function, recognizing common issues, following proper maintenance guidelines, and replacing worn components as needed, you can ensure that your Civic’s braking system operates at peak performance for safe and confident driving mile after mile. Regular inspections, timely replacement of worn parts, and proper installation are key to maintaining optimal braking performance and enjoying the full benefits of your Honda Civic’s reliable stopping power.